Showing posts with label cheese. Show all posts

Saturday, November 1, 2014

Mac and Cheese Waffles, Leftover Makeover!

Mac and Cheese Waffle topped with Sarayo by Xhico
My aunt sends me emails constantly of stuff to try cooking. I think somewhere in the flurry of her emails I saw something about Mac and Cheese Waffles. I never read the article, but remembered it today when I was thinking of what to do with all this leftover amazing Mac and Cheese. So I decided to pull out the waffle iron and give it a go.

I gave the waffle iron a light coat of non-stick cooking spray and heated it up on medium-high. Then I saw some smoke and could smell a burning odor. Oops. I put the cooking spray onto way too soon. But I kept going. I sliced out a piece of mac and cheese from the casserole dish. I laid it in the waffle iron and it began to sizzle. I pressed the waffle iron until it was tight. I could hear the cheese crackling away and I could begin to smell it in the air. It was delightful. I waited and waited for about 8 minutes and thought it was done.

When I opened the waffle maker my macaroni surprise fell apart. The center feel right out as the top stuck snuggly to waffle iron. I pried it away from the top and bottom and set the crispy bits on a paper towel. I tasted them and they were salty, cheesy, crispy goodness. I had to make this work. Being a designer, makes me a good problem solver among other things.

After a quick wipe down, I let the waffler get hot. This time I sprayed a nice coat of non-stick cooking spray right before I put the slice of mac and cheese in. Also, I just gave it a gentle pressure as I closed it and didn't force it in too hard. This time I waited with anticipation. Would my adjustments give me a magic-mac-cheesy-waffle?

The aroma of the cheese crisping was promising. The crackling sound was another sign things were going good. After about 10 minutes I opened the waffle iron and it came away from what has become a golden crunchy crust of cheese. "Yahoo!" I exclaimed. I was so excited that I had actually accomplished this leftover make-over. I took the waffle out and could hardly wait to eat it. I threw it on a plate, topped it with some Sarayo and got to work on that salty, crackly, gooey, cheesy wonder waffle.

Get my BAKED MAC AND CHEESE RECIPE here!

Thursday, October 30, 2014

Recipe: Baked Mac & Cheese

Baked Macaroni and Cheese
When I was a kid I loved when that little blue box would come out. I could here the noodles shake in the box and Could totally relate to how my dog felt everyday when he heard the food coming. In that blue box was mac and cheese magic. Little elbow noodles in nuclear orange colored sauce that tasted like heaven. By the time I was ten, I could manage to make it on my own.

It wasn't until I was a teenager and staying at a friends house when his mom said she was making macaroni and cheese, but there was no blue box in sight. No jiggling sound of noodles. I was puzzled. But then I was mesmerized as she began to mix together butter, flour, milk and cheese to make this incredible cheddar sauce. She poured the creamy goodness over perfectly cooked jumbo shells and folded them together. And to my amazement, there was macaroni and cheese – made from scratch, not a little blue box. 

Baked Mac and Cheese
While I was in college, I remembered that night and decided I too would make mac and cheese from scratch. I found a cookbook with a recipe. Though I was frightened by the idea of a bechamel sauce, I would find that it was easy and would become a foundation for many cooking techniques later. So don't be afraid. Ditch the blue box and make some real homemade mac and cheese for your family, but more importantly your self! Treat yo' self!

BAKED MAC AND CHEESE RECIPE:

You will need a large casserole or baking dish, a large high-sided sauce pan for sauce, a large stock pot for pasta and wooden spoon.

Ingredients:

Bechamel Sauce:
1 Stick Butter
1/2 Cup Flour
4 Cups Whole Milk

Seasoning:
5-7 Cloves of Garlic, Finely Diced (You can add more garlic if you're into it and don't have anyone to kiss after dinner)
1 Tbsp Salt (plus more for pasta water)
1 Tbsp Ground Black Pepper
1 Tbsp Mexican Oregano (you can also use Italian Oregano)
1 Tbsp French Thyme
1/4 tsp Freshly Grated Nutmeg (Optional)
1 Tsp Cayenne Pepper (Optional)

1/2 Cup Panko Bread Crumbs - Reserved for Topping(Optional)

Cheese:
2 Cups Sharp Cheddar
1 Cup Smoked Cheddar
1 Cup Gruyere
1 Cup Pecorino Romano
(You can use all Cheddar if you want or any combination of these cheeses or other cheese such as Monterey Jack, Fontina, Pepper Jack, etc.)

Noodles:
1 Pound Box of Elbow Macaroni
(I also like to use Jumbo Elbow Macaroni, Penne and Rigatoni)


METHOD:

1. PREP
- Chop garlic
- Measure out all seasonings and put in small bowl
- Grate cheese and put into one large bowl (Set aside a 1/2 cup of cheese for topping)
- Butter the bottom and sides of your casserole or baking dish

2. Preheat oven to 400º F and put the rack in the center.

3. Bring a large pot of heavily salted water to a boil in a large stock pot. Add noodles and return to a boil and cook for about 3-4 minutes. The noodles should start to be soft, but still undercooked. Drain noodles and rinse with very cold water to stop them from cooking. Set pasta aside.

4. In large high-sided sauce pan add butter on medium-low and let melt. Once butter is melted add flour. With a wooden spoon constantly stir flour mixture and it will form into a paste. Continue to cook for about 3 minutes until it starts to turn golden-brown. This mix is called a roux and is often used to thicken sauces and soups.

5. Once your roux is golden brown, slowly add your milk about 1 cup at a time. Constantly stir the mixture as you add the milk - slowly breaking up the flour mixture. It will look clumpy and first but as you add the milk it will loosen up. Continue stirring constantly and bring to a boil. Be sure to stir gently and scrape the bottom of the saucepan as you stir. This will prevent the milk from building up and scorching at the bottom. 

6. Turn off heat and stir in garlic and seasonings. Stir until mixed through. Begin to add cheese handfuls at a time. The sauce should still be hot enough to melt the cheese itself. Stir until all cheese is melted and throughly combined. At this point taste the sauce to see if you need to add any additional salt or seasoning.

7. Gently fold your noodles into the sauce until all noodles are coated with sauce. *Note: If you don't want to bake it and eat it all hot and cheesy right off the stovetop, you can! Just cook your noodles all the way to al dente and you're good to go!

8. Pour the noodle mixture into your baking dish. Top with 1/2 cup of cheese and bread crumbs.

9. Bake uncovered in oven at 400ºF for 30-40 minutes until cheese is bubbling and top is golden brown. Remove from oven and let stand 5-10 minutes before serving.

Provecho!

Saturday, April 26, 2014

El Papón: High or Hungover, This Is What You Need

(Xhico in Mexico)

The Tradicional Papa Rellena at El Papón in Mexico City.
 I may have been slightly hungover after too much mezcal from the night before as I stumbled out of Superama with some aspirin. Along the exit of the parking lot were the usual food carts selling tacos, tlacoyos and quesadillas. This one cart stood out to me, with a heap of foil wrapped objects. As I began to examine the menu and these odd shaped foil entities, I realized that they were two baked potatoes wrapped in one. Of course they were... I was at El Papón.

Potatoes wait to be smothered in goodness.
Chiles roasting

I didn't take me long to realize that these siamese-twin astronaut potatoes were going to get extremely insane with mounds of delicious toppings. An overloaded potato - this is what I really needed instead of aspirin. My belly begged to to quickly scan the menu and make a decision on the level of overload I would be achieving. How much cheese? How much butter? What combination of meat and other tidbits?
The dudes from El Papón, Mexico City.

El Papón, Food cart in Mexico City.
Two extremely friendly guys were eager to get to work on my potato. I decided to go with the Tradicional. I thought it would be the lesser of the evils. It turns out that it was a whole lot of evils together. First the potato master (as I like to call him) took the potatoes nested together and foil and began to beat them. He beat them and turned them and beat them some more until they formed a thick potato disc. Then with the precision of a surgeon, he slit an "X" into the foil and gently pulled the foil away from the center. He then began to fork the potato! He worked that fork and mashed up the inside. This was the beginning of a magical transformation. Possible more magical than the transformation of a caterpillar to a butterfly.

Making baked potato magic at El Papón.
This once ugly potato began to be mushed with butter, then manchego cheese and it got prettier by the second. Then some jamón serrano. This potato was getting seriously sexy as it oozed before my eyes. Wait, then more cheese? Yes, more cheese - this time some ooey-gooey cheddar. Then how about some bacon and cream to top it off? This is some xrated potato action. I went into a foodgasm. I had to wait to get home to share it with Tanya, as I thought she may be in need of the same medicine. I won't lie, I did finger some of the cheese.

A few days passed and I was going to show Tanya where this potato cart heaven was to be found. But it wasn't there. After a quick drive around the block, we discovered that they opened a restaurant on the corner in addition to the cart. So make sure if you have a hangover in Mexico City and there isn't any birria around, to go get your self a potato orgasm to soak up all that alcohol.

El Papón is sometimes out side the Superama on Fernando Montes De Oca, The restaurant space is right down the corner on Fernando Montes De Oca and Jose Vasconcelos Circuito Interior in Condesa, Cuauhtémoc, Mexico City, Distrito Federal.

Wednesday, February 19, 2014

Recipe: Mini Bistec Tortas

My trip to Mexico City did me some good. I just made the most amazing sandwiches! I made mini bistec tortas with salsa I brought back from Mexico.


So I halved two small rolls and grilled them with butter. I took some homemade black beans (you can used can beans if you want) and quickly refried them in the skillet while grilling a thin slice of steak (bistec) in the same pan on the side. I then coated the rolls with a thin layer of mayo for moisture. Then I put the refried beans on the bottom layer and topped it with Oaxacan Cheese (this kind is perfect for melting). I put the cheese side straight onto the skillet and let the cheese melt and get crusty. I scooped it up, put on a slice of steak and then finished it with the salsa I bought at the gourmet market in Mexico City. It's a spicy oil with nuts and quite delicious. You can use any salsa you like to spice it up!

Tuesday, March 19, 2013

Recipe: Parmesan Crisps

Parmesan Crisps are easy to make, delicious and make you look awesome in front of your friends. You can make them into crackers, garnish or a topping for sandwiches the way I do. There's really no recipe, it's just a simple method. You can use a fresh wedge of parmesan and grate it or you can buy the pre-grated parmesan in the tubs. I feel the fresh parmesan cheese has a bit richer and fresher taste and takes a little less time to cook.
Parmesan Crisp as a Cracker

Here's how you make a Parmesan Crisp:

1. PREHEAT OVEN TO 300º 
I like to make sure my oven is evenly pre-heated for at least 10 minures.

2. COOKIE SHEET
Get your cookie sheet ready. Any flat cookie sheet will do, large or small. It just depends on how big you want to make your crisps and how many you want to make. On your cookie sheet place parchment paper or a Silpat (silicon cooking mat) if you have one.

3. PARMESAN CHEESE
Get your cheese ready. Use either a fresh wedge and grate it on a grater or use pre-grated cheese from the deli section of your supermarket.

You can use any amount. It just depends on how big you want to make the crisps. Here are some different ways:

• Parmesan Crisp Crackers: Put about 1 1/2 - 2 tbsp of grated cheese in a little pile. Gently spread out from center so it is about 2" round and just a few layers of cheese

• Sandwich Parmesan Crisps: Look at your bread and sprinkle cheese a little large than the shape of your bread. Add one more layer of cheese by sprinkling. You want it to all be connected evenly, but still just a thin layer of cheese.

• Parmesan Crisp Garnish: You can make crisps in any shape you want by sprinkling or using a template. Play with making them thin. If you lay the cheese very sparse you can make them appear very "lace-like"

4. SEASON
Seasoning is optional. The cheese is already salty, so you don't need salt. For a little extra flavor and color you can try different seasonings. I like to use fresh cracked pepper. I often use green szechuan peppercorns. You can also try smoked paprika, fennel pollen, caraway and really anything else you want.

5. BAKE
Bake in oven pre-heated to 300º for 8-12 minutes until golden brown. I recommend setting timer for 8 minutes and checking on them. Watch them closely until they are golden. Remove from oven and let cool and place in tupperware to keep fresh.

Recipe by Xhico

Saturday, July 30, 2011

Street Fried Quesadilla

Quesadilla all done up

I left this art show in Echo Park last night. I was starving and my favorite blue corn quesadilla lady wasn't around. But I saw a woman kitty corner at the intersection with a small cart and steam rising above her. I couldn't wait for the lit red hand to change to the walk signal and I crossed toward her.


I heard her saying, "quesadillas" as I approached. When I go there I saw what seemed to be more of giant empanadas. But they were more of a deep fried quesadilla. She made a tortilla like shape out of dough and stuffed them with cheese and potatoes (she also had cheese and chorizo or just cheese). She folded it in half and dropped it in the hot oil. She then served it to me, what i call, pupusa style - topped with cabbage, sour cream and crumbled cheese. Then she had all these delicious salsas to choose from... Avocado, Tomatillo, Salsa Roja and Habanero, which was pretty spicy. Overall it was delicious but a little messy. I could have used a knife.

WHERE:
Quesadilla Street Cart

Sunset Blvd & Echo Park Blvd.
Echo Park, Los Angeles


Quesadillas on the streets of Echo Park


Salsa bar street cart style

before salsa

after salsa


Thursday, February 17, 2011

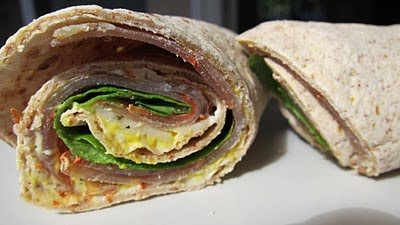
Lunch: Lomo & Gouda Wrap


Lomo & Garlic-Basil Gouda wrapped in multigrain flatbread with mayo, mustard and lettuce from garden.

Saturday, February 12, 2011

Sandwich: Lomo & Gouda

I love sandwiches!

Lomo & Garlic-Basil Gouda Sandwich
I made this delicious Lomo & Garlic-Basil Gouda on French Baguette with Olive Oil, Dijon and a little Mayo. The cheese is from my hometown of Oakdale, California at the aptly named Oakdale Cheese Factory. 

Sunday, December 5, 2010

Hangover Cure TVC

A trip to TVC is something we often have to do. One of the first things I learned about when I moved back to this part of LA was about Tacos Villa Corona. My neighbors introduced me to it after a hard night of partying. We all woke up in a little pain with an intense hangover. We needed something in our bellies and everyone's immediate first response was "TVC!".

I couldn't muster up the energy to go, but the girls brought me back the most delicious breakfast burrito filled with eggs, potatoes, spinach and cheese. It's even good for vegetarians. Make sure to order the "papas burrito with spinach" and ask for extra salsa. Though you'll be tempted to gobble it down, take your time and cure that hangover. You might want a little hair-of-the-dog too.


Tacos Villa Corona is located in the Atwater Village neighborhood in Los Angeles at 3185 Glendale Blvd Los AngelesCA 90039. (323) 661-3458

See more delicious food from Tacos Villa Corona on Foodspotting.

Thursday, February 21, 2008

Phillipe Burger - YUM!


Illustration by Xhico

I went today to my favorite lil' restaurant in Palm Springs, Chez Philippe. I recently designed some characters (above) and some display menus for him. He added a Burger to his menu, so I had to give it a try... DEE-LISH-US! It was a great burger!

The Kobe Beef patty with thick, juicy and full of flavor. It was simply seasoned and the full flavor of the beef really came through. The toasted Brioche Roll offered a slightly crusty, yet light compliment to the hearty patty and thick melted layer of Swiss Cheese. The burger was moist and need very little condiments, so a dab of Garlic Aioli did the trick. It was traditionally finished with tomato, onion, and hearts of romaine. Though the romaine provided a nice crunch, I would have preferred Arugula to add a bit of a peppery bite.

The burger was served with Mixed Greens with a tasty house vinagrette. The French Fries were, well, French Fries. Nothing special - they could have been a bit more gourment to really compliment the burger. Skinny, crunchy fries would have been perfect!

Overall, another delicious meal at Philippe's. Bon Appetit!